Posts

Showing posts with the label rc

Fuselage, finishing touches

Image
The landing gear and battery hatch are two areas that I modified from the original plans. The wider opening will accommodate a wider 1,500 mAh LiPo for a longer flight duration. The landing gear is made out of 2mm steel wire and is taller than the original aluminium frame. The landing gear is lighter and provides clearance for the 8x6 prop that I intend to use.  I formed the battery hatch out of 3/8" stock and glued three magnets with matching washers on the fuselage for attachment. Ornamental pilot head-rest Skid, 1/16" ply horn, and elevator push rod visible The complete fuselage (without two servos) weighs 124 grams (about 4.4 oz), which is much below my original goal of 220 grams. Adding the two wings yields about 200 grams total before lacquer and covering. My estimated AUW will be about 395 grams with a 1,500mAh battery and 240 grams with an 800mAh battery.

Fuselage, part 2

Image
The fuselage is taking shape and by following the advice in the build article I turn my attention to the tail section and build the stabilizers, elevator and rudder. I used 3/32" balsa instead of 1/16" for a more sturdy structure. 3/"32 balsa was still too thin for nylon hinges and for a retro look I went with hinges made out of white silk span, which is an idea I got at the hobby shop while chatting with the owner about my plans for the silk span I purchased. Once again, my magnet board was useful in achieving a perfect right angle between the horizontal stab and the fin. Once dry, I fitted the stabilizers onto the fuselage, with the top-wing pylon, and completes the top sheeting. here are some close views or the work so far after some basic sanding. And the overall look of the model with dry fitted wings. The fuselage weighs about 77 grams, which is so far much below my target. I still need to add the battery compartment cover with magnets, landing gear, and push-rods.

Fuselage, part 1

Image
Before setting out to build the fuselage I decided to do some planning and lots of reading. My Chicken Hawk will be powered by an electric motor so I had to make some changes to the fuselage in order to accommodate a battery, an ESC, and a different motor form factor. The plans also depict a control mechanism that I will replace with two 9 gram servos and a receiver. Because I don't have access to the plans of the modern kit, my only option was to closely examine picture on various build logs and articles, as well as draft some ideas before starting to cut any balsa. My modifications were simple. I replaced the bottom covering between former F1 and F3 with a hatch and an opening for the battery. I also refashioned former F2 with a larger opening. Moving former F1 forward by 3/4" gave me more space for the electronics and eliminated the need for any extension to the motor backing. Heeding the advice of others, I was very careful marking and cutting the fuselage sides. I used tw...

Bottom wing

Image
I decided to modify the build process of the bottom wing. The process is similar to the top wing but in this case I will keep the bottom sheet firmly held flat while gluing on the top sheet. Second, I am going to glue the top sheet in sections: LE, TE, then wing root. I'll be fitting each section into place individually instead of gluing it as one assembled piece. To do this, I cut the TE sheet with a 1/4" extra material at the edge where the TE meets the LE. Once the LE is glued and dry, dry-fit the TE, mark the line where both edges meet, and cut. The edge may need some (very) light sanding with a straight sanding block to get a good fit The two bottom sheets, spar, ribs, and dihedral brace are done. The left wing panel is held down to the building board and has the LE sheet fit and glued. The TE sheet is waiting for its turn. TE sheet now glued. The balsa sheet might need to be damp in order to help in forming it to the rib curvature. The left wing panel is done and perfect...

Top wing

Image
I started with building the top wing then the bottom wing, and included some picture and comments as I progressed with this first step. I followed the exact same process when building the bottom wing. For each wing I traced and cut the set of four LE and four TE sheeting according templates. I made the templates out of packaging cardboard. The top-wing templates are visible in top right of this picture. The bottom sheeting (3 pieces) of each wing panel include the LE, TE, and wing root sheet that I glued together to form a single piece.  Closeup of magnets holding 1/16" balsa sheeting. Spar and ribs. Left wing with-top sheeting attached with clothes pins. The top sheeting was glued in three stages: TE then LE, and finally wing tip. I used water to dampen the the top sheet, mainly LE and wing tip, to help form and curve the sheet to the ribs. The plans call for the top sheeting to have the same dimensions as the bottom sheeting. I found that if I extended the overall width by 1/8...

Magnetic building platform

Image
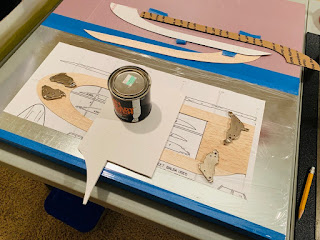
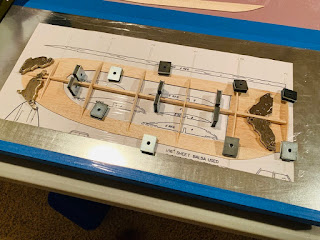
A friend at our RC club started using a magnetic building board instead of the traditional pinning method. He shared his insight and I decided to try this out when building the Chicken Hawk. After researching the topic I found several web pages and instruction videos on the topic, and here is what I ended up using for the build: 12"x24" galvanized sheet metal that I purchased at the local hardware store for $12 24x square magnets with metal plates. This type is used for cabinet doors and are sold in bulk on places like Amazon for a 24x (73c a magnet) or 100x count (46c a magnet) All for about $30 I attached the sheet metal to the lower half of my 24"x24" building board and started my build. This picture is of the bottom part of the left wing, sheeting, spar, and ribs held firmly down while glue is drying. I would recommend getting the magnets with the metal plates on them. The plates are removable and seem to align the magnetic field when a stronger hold is needed. ...

Getting started

Image
A few months ago I was browsing Outerzone  in search of my next scratch build project. I was not sure what I was looking for when I came across several biplane designs and that's when I made up my mind: my next build will be a Bipe. I narrowed my search for a specific wing span range and R/C capabilities, and the Chicken Hawk caught my eye.  I bookmarked the plans for a later date and continued my flight lessons with the club. A couple of months later I came across an AMA magazine article by  Bob Benjamin describing his build of the plane from a kit available at Retro RC LLC. Now I had two choices: build from scratch or get the kit. Five months later I'm building the Chicken Hawk from scratch. Bob Benjamin's article and the info from Retro RC was an added bonus to Ted Strader's detailed build article that is also posted on Outerzone. Combining all the tips and tricks from these sources will sure help get over some of the difficult parts of the assembly. I printed the ...