Posts

Showing posts with the label wing

Covering

Image
Fuselage The fuselage received two coats of Sanding Sealer with light sanding using a 400 grit paper before each coat . After the first two coats I applied the orange Silk Span trim patterns. I wet the orange Silk Span with water from a spray bottle, positioned it carefully, and removed any trapped air bubbles. Once satisfied, I applied Sanding Sealer to the orange Silk Span to fix it in place. When dry, I ran another light sanding of the entire fuselage and applied the final coat of Sealer. Battery compartment cover. I added a "CH"emblem on the right side of the fuselage made out of black iron-on covering. I printed a template with the size and font I wanted and cut the lettering with a sharp hobby knife. Wings I followed the test covering process I did on the balsa frame and covered the wings with clear (white) Silk Span. Once the edges where dry, I followed with light sanding and a coat of Sealer. I added the orange color trim following the 1963 patterns. Just like the fus...

Bottom wing

Image
I decided to modify the build process of the bottom wing. The process is similar to the top wing but in this case I will keep the bottom sheet firmly held flat while gluing on the top sheet. Second, I am going to glue the top sheet in sections: LE, TE, then wing root. I'll be fitting each section into place individually instead of gluing it as one assembled piece. To do this, I cut the TE sheet with a 1/4" extra material at the edge where the TE meets the LE. Once the LE is glued and dry, dry-fit the TE, mark the line where both edges meet, and cut. The edge may need some (very) light sanding with a straight sanding block to get a good fit The two bottom sheets, spar, ribs, and dihedral brace are done. The left wing panel is held down to the building board and has the LE sheet fit and glued. The TE sheet is waiting for its turn. TE sheet now glued. The balsa sheet might need to be damp in order to help in forming it to the rib curvature. The left wing panel is done and perfect...

Top wing

Image
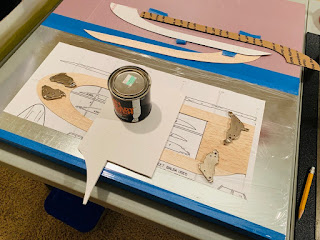
I started with building the top wing then the bottom wing, and included some picture and comments as I progressed with this first step. I followed the exact same process when building the bottom wing. For each wing I traced and cut the set of four LE and four TE sheeting according templates. I made the templates out of packaging cardboard. The top-wing templates are visible in top right of this picture. The bottom sheeting (3 pieces) of each wing panel include the LE, TE, and wing root sheet that I glued together to form a single piece.  Closeup of magnets holding 1/16" balsa sheeting. Spar and ribs. Left wing with-top sheeting attached with clothes pins. The top sheeting was glued in three stages: TE then LE, and finally wing tip. I used water to dampen the the top sheet, mainly LE and wing tip, to help form and curve the sheet to the ribs. The plans call for the top sheeting to have the same dimensions as the bottom sheeting. I found that if I extended the overall width by 1/8...